
By Lam Seng Fatt
After listening to the Audioquest DragonFly USB DAC, I can understand why it took the hi-fi and CAS world by storm several years ago. For relatively litte money, the DAC which looks like a thumb-drive, sounds as good as standalone DACs costing two to three times its price.
The Audioquest DragonFly has been so successful that there are many copy-cat versions of it in the market – some legit and some counterfeit.
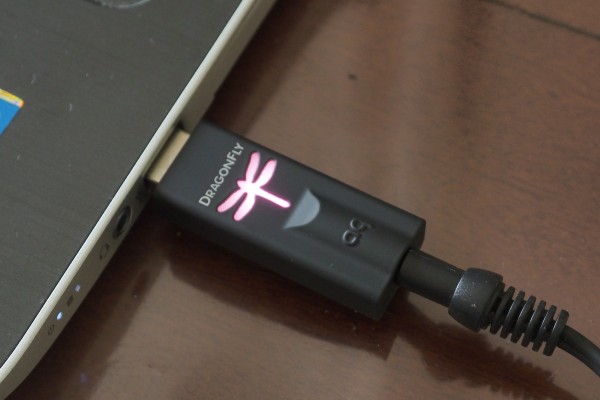
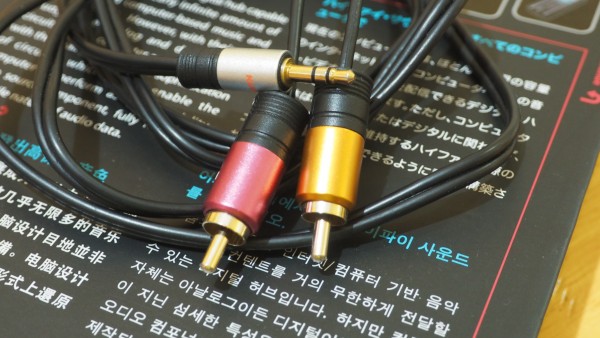
The heart of the DragonFly is an ESS Sabre DAC chip. The DragonFly is powered from the USB slot and accepts all files from MP3 to 24/96. There is a jack at the end of the USB DAC for headphones. This output can also be used with a mini headphone jack to RCA plugs adapter cable to connect to active speakers, a preamp or power amp.
The DragonFly has an internal volume control that can be used to set it to be either for fixed output to be connected to a preamp or variable output to be connected to a power amp or active speakers.
The USB connection is asynchronous and it has dual fixed frequency master clocks for sample rates such as 44.1kHz, 48kHz, 88.2kHz and 96kHz. To show which file you are playing, the dragonfly logo will change colour – green (44.1), blue (48), amber (88.2) and magenta (96). This colour coding method was later adopted by Chord Hugo (though Chord’s colour scheme is different).
Setting it up is easy and you do not need to download any firmware or music player. All you have to do is plug the DragonFly into a USB slot in your laptop, wait for it to light up, go to ‘Settings’ and search for ‘Sound’ and select ‘Audioquest DragonFly’ as default device (note that I am using Windows 10).

I used my HP Intel i7 laptop with J River V20 to play CD rips (16/44.1) and downloads from HDTracKS (24/96). I used two pairs of headphones – the Sennheiser HD600 and Audio Technica Pro5 Mkii.
I was quite surprised by the quality of the sound – it was clean and clear and surely sounded like it came from a more expensive component.
However, the tonal balance was a bit on the dark side and it did not really suit dark-sounding headphones like the Sennheiser 600. With this combination, the sound was smooth and ‘smoky’ with a nice allure to it, but the treble was a bit dim which made the mid a bit thick.
Switching to the brighter-sounding Audio Technica headphones showed that they were a better match and the sound became clearer especially on the upper-mid to high range while the mids lost some of the richness. However, the clarity of the sound gave the music more immediacy and I spent more time using the Audio Technica Pro5 Mk II headphones.
I decided to try the Audioquest DragonFly with the big rig, but I needed a mini headphone to RCA adapter and I had to make another trip to Amcorp Mall to borrow the cable from Alton Chan of Wave.
Back home I plugged the mini headphone end of the cable to the DragonFly and the RCA plugs to the Lamm preamp. There was no sound… It took me a while to figure out what went wrong. At last I realised that I had set the J River’s volume control to ‘Disabled’ and when I set it to either ‘Internal’ or ‘System’, it worked. For the DragonFly to function as a fixed output DAC, both the J River volume control and the DragonFly’s volume control must be set to maximum.
I played the same CD rips of Bad Company and the HDTracks 24/96 version of Herbie Hancock’s River: The Joni Letters.
Again, the tonal balance was dark and again the advice would be to use the DragonFly with a brighter-sounding system. But what surprised me was the spacious soundstage and the separation of images. I have come to realise that lower-end, budget DACs often sound two-dimensional with all the sound coming from a flat plane. And often the images are congested in the middle space between the speakers.
It was not so with the DragonFly – the separation of images was much better than that from DACs costing two to three times more. And the level of transparency was also shocking – taking into account the price of the USB DAC.
There is already a new version out – it is called the 1.2. From Audioquest’s website: “Among the improvements, the circuitry between the DAC chip and the analog output stage has been refined to create a more direct signal path, leading to even greater transparency and immediacy. Also, the DAC’s power supply has been fortified, which gives the sound more ‘grip’ and even greater dynamic contrast.”
If you are starting out into the world of CAS, the Audioquest DragonFly is one of the best buys in the market. Alton Chan is selling it at around RM500. However, he only has V1.0 in stock.
Wave is on the top floor of Amcorp Mall, Petaling Jaya.